
Hamnet VPN via L2TP
Overview
- Hamnet VPN
- Hamnet VPN Setup under Raspbian 12 (GUI Desktop)
- Step #1 Launch the Network Manager
- Step #2 Tab General
- Step #3 Tab VPN
- Notes on where to save the VPN password
- Step #4 Tab Proxy (leave untouched)
- Step #5 Tab IPv4 Settings (add Hamnet specific routes)
- First start of VPN session to the Hamnet
- Debugging failed VPN connections
- Configuration files used by network manager
- How to create a VPN configuration via command line (no chance so far)
- Connect to Hamnet VPN server without GUI desktop (terminal session with
nmtui) - Disconnect from Hamnet VPN server without GUI desktop (using
nmtui) - Troubleshooting
- Unexpected password request (access to Gnome keyring)
- Collection of URLs
- L2TP, Hamnet VPN setup
- Gnome keyring
Hamnet VPN
The basic configuration steps were applied to and verified on systems running
- Ubuntu/Xubuntu 20.04 (very old)
- Ubuntu/Xubuntu 22.04
- Raspbian 12
The procedure can be applied in the same way to Linux Mint and many other systems based on Debian/Ubuntu.
The following configuration steps allow a connection to the HAMNET DB0SDA via L2TP protocol. The VPN server is provided by hams at the RWTH Aachen University.
Hamnet VPN Setup under Raspbian 12 (GUI Desktop)
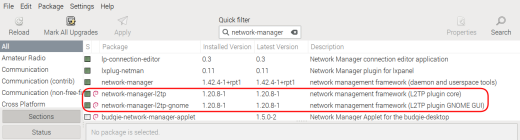
Have the following packages installed:
sudo apt-get -y network-manager-l2tp network-manager-l2tp-gnome
or use Synaptic Package Manager to install these packages:
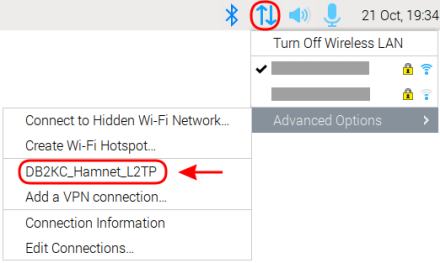
Step #1 Launch the Network Manager
On the system tray click on the network icon:

From the pulldown menu
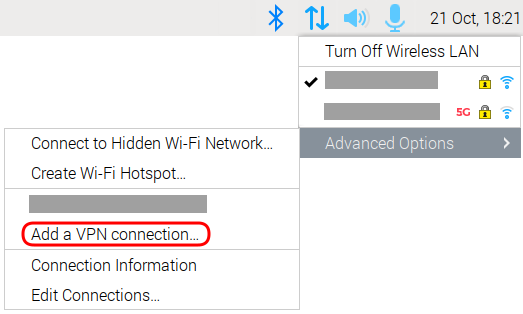
select Advanced Options → Add a VPN connection…
A window pops up Choose a VPN Connection Type
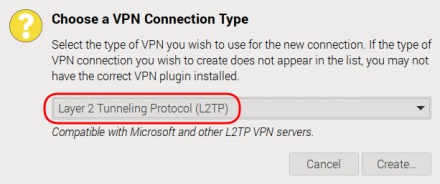
Depending on which protocols your system supports (actually which additional network-manager-... packages you have installed) select the option Layer 2 Tunneling Protocol (L2TP) as shown on the screenshot above.
The VPN configuration window pops up
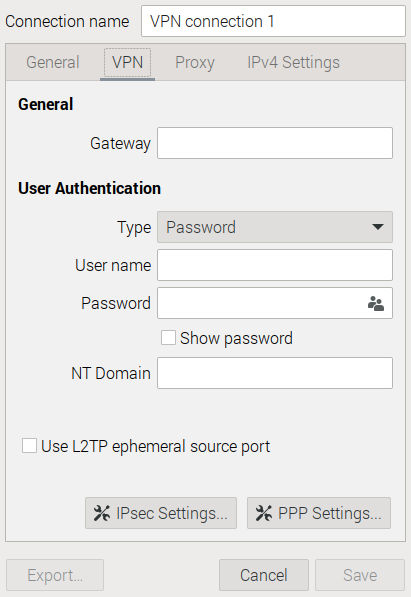
If the tab VPN tab is missing then you may not have network-manager-l2tp-gnome installed.
On a Raspberry Pi system running Raspbian 12 you may notice that the buttons IPsec Settings... and PPP Settings... are missing.
Window not properly sized
If you move the mouse pointer close to the right border you will see the scrollbar. To fix this kind of issue simply increase the vertical size of the window. You may regard this oddity as a LXDE bug, not as a feature.
Step #2 Tab General
Give the connection a meaningful name, for example DB2KC_Hamnet_L2TP preceeded with your callsign (in my case: DB2KC).
Remove the tick mark All users may connect to this network assuming that this is what you want.
Leave the setting for option Metered connection untouched.

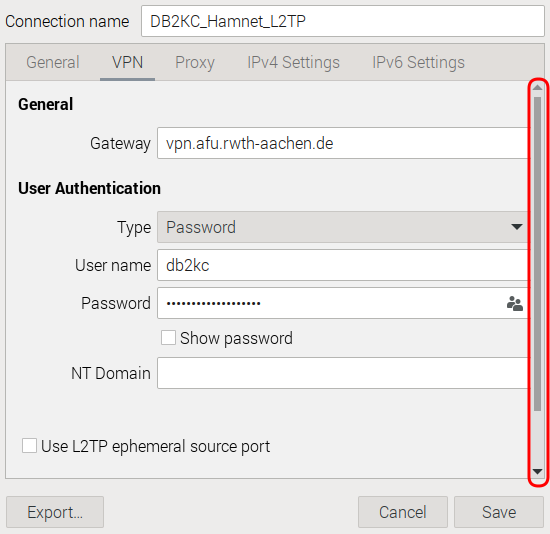
Step #3 Tab VPN
Under Gateway add vpn.afu.rwth-aachen.de. You may test your network environment by sending a ping to this server.
Under User Authentication select for Type the option Password.
For Username enter your call sign in lowercase letters.
As VPN Password enter the string that was given to you by the administrator of the VPN server.

Specify Gateway and user credentials
On the right of the text field click on this little icon

From the popup menu select your preferred option (see explanations under Notes on where to save the VPN password)
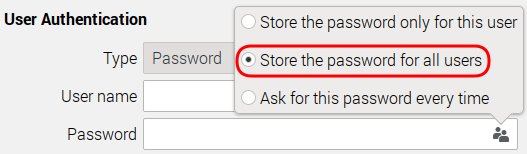
With the selection of Store the password for all users the VPN password is stored into the file /etc/NetworkManager/system-connections/Connection_name.nmconnection, accessible only by user root.
Click on the button IPsec Settings
Set tick mark for Enable IPsec tunnel to L2TP
As Pre-shared key: hamnetaachen
Back to the tab VPN. Click on the button IPsec Settings…

Expect to see this popup window:
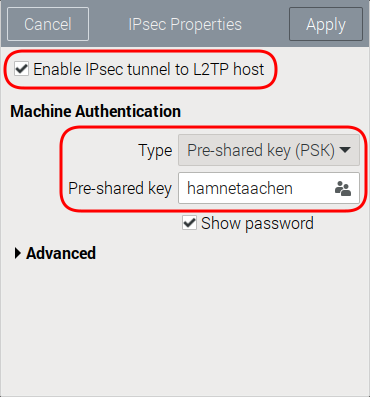
Set tick mark for Enable IPsec tunnel to L2TP.
For option Type select rom the pull-down menu Pre-shared key (PSK)
Pre-shared key: hamnetaachen.
Select Store that password for all users (Note: with this selection the key is added to the config file under /etc/NetworkManager/system-connections)
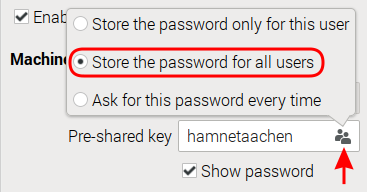
With a click on the little icon on the right select the option where to save the password
Close this window by clicking on Apply.
Back to the tab VPN. Click on the button PPP Properties… :

The window PPP Properties will pop up.
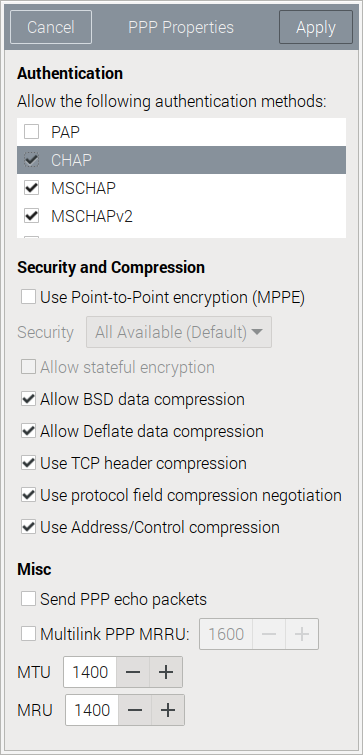
Deselect the options PAP and EAP (below MSCHAPV2 and not visible on this screenshot), but leave the options CHAP, MSCHAP, MSCHAPv2 selected. Leave all the other optioins untouched.
Close this window with a click on Apply.
Notes on where to save the VPN password
NetworkManager Option
Location
Comments
Store the password only for this user
~/.local/share/keyrings
Gnome keyring: a very safe place, data is password protected, however user is asked for the keyring password each time a VPN connection is made. The CLI application nmtui is not capable to grab the password, a GUI desktop is required for access to the VPN password.
Store the password for all users
/etc/NetworkManager/system-connections
File only accessible by the administrative user root, same level of security as Wi-Fi passwords.
Ask for this password every time
Highest level of security, not very user-friendly, annoying and risky as users tend to forget passwords.
Step #4 Tab Proxy
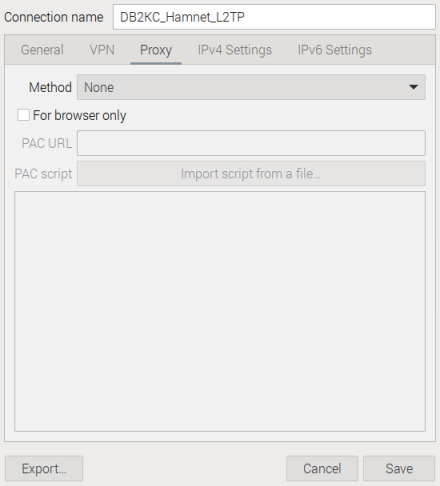
Leave everything untouched. Do not configure anything here unless you pretty well know what you are doing.
Move on to the next tab.
Step #5 Tab IPv4 Settings
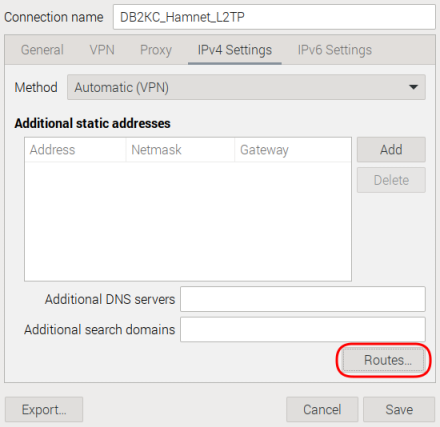
leave everything untouched here
Click on the button Routes… :
A new window pops up. Add the following configuration to it:

| Address | Netmask | Gateway | Metric |
|---|---|---|---|
| 44.128.0.0 | 255.192.0.0 | 44.148.186.1 |
In addition, set the following tick marks:
- Ignore automatically obtained routes
- Use this connection only for resources on this network
Close this window with a click on OK.
far back in time the hamnet was built up with the following network ranges
| Address | Netmask | User |
|---|---|---|
| 44.0.0.0 | 255.128.0.0 | USA only (approx 8 Mio adresses) |
| 44.128.0.0 | 255.192.0.0 | Rest of world (approx 4 Mio adresses), at the time of writing partially managed by hamnetdb.net |
| 44.192.0.0 | 255.192.0.0 | sold to Amazon |
The ranges 44.0.0.0/9 is no longer routed in the european hamnet and the range 44.149.0.0/10 is unavailabe due to the selling to Aamazon.
First start of VPN session to the Hamnet
With all the above-mentioned work completed so far give the configuration a try.
Open a terminal session and start logging the activities of the network manager:
journalctl -o short-iso --unit=NetworkManager -f
or (with logging to a temp file)
journalctl -o short-iso --unit=NetworkManager -f | tee -a /tmp/vpn_hamnet.log
For full microsecond precision replace short-iso by short-iso-precise.
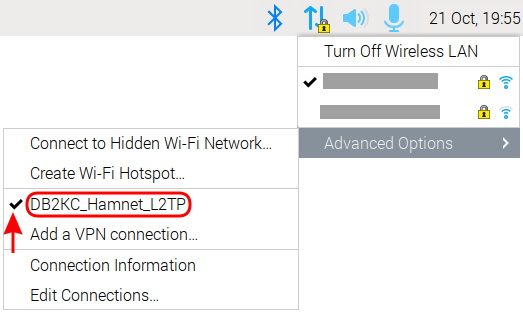
From the system tray start the VPN connection. Click on the network icon → Advanced Options → name of the VPN connection:
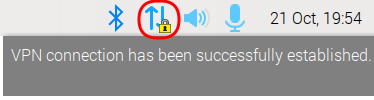
As soon as connection to the VPN server is up and running the network icon shows a yellow lock. In addition, you will se the notification VPN connection has been sucessfully established.
You may disconnect from the VPN server with a left click on the network icon → Advanced Options → name of the VPN connection:
In the syslog you may see messages like these while trying to open a VPN session (timestamps removed):
NetworkManager[]: <info> [] vpn[0x55a39ae640,007a16b0-9158-4fc4-b69e-a9d815f57480,"DB2KC_Hamnet_L2TP"]: starting l2tp
NetworkManager[]: <info> [] audit: op="connection-activate" uuid="007a16b0-9158-4fc4-b69e-a9d815f57480" name="DB2KC_Hamnet_L2TP" pid=1234 uid=12345 result="success"
nm-l2tp-service[]: Check port 1701
nm-l2tp-service[]: Can't bind to port 1701
nm-l2tp-service[]: xl2tpd started with pid 104739
NetworkManager[]: xl2tpd[104739]: Not looking for kernel SAref support.
NetworkManager[]: xl2tpd[104739]: Using l2tp kernel support.
...
NetworkManager[]: xl2tpd[]: Calling on tunnel 6825
NetworkManager[]: xl2tpd[]: Call established with 137.226.79.99, Local: 60874, Remote: 84, Serial: 1 (ref=0/0)
NetworkManager[]: xl2tpd[]: start_pppd: I'm running:
NetworkManager[]: xl2tpd[]: "/usr/sbin/pppd"
NetworkManager[]: xl2tpd[]: "plugin"
NetworkManager[]: xl2tpd[]: "pppol2tp.so"
NetworkManager[]: xl2tpd[]: "pppol2tp"
NetworkManager[]: xl2tpd[]: "7"
NetworkManager[]: xl2tpd[]: "passive"
NetworkManager[]: xl2tpd[]: "nodetach"
NetworkManager[]: xl2tpd[]: ":"
NetworkManager[]: xl2tpd[]: "file"
NetworkManager[]: xl2tpd[]: "/run/nm-l2tp-007a16b0-9158-4fc4-b69e-a9d815f57480/ppp-options"
pppd[]: Plugin pppol2tp.so loaded.
pppd[]: Plugin /usr/lib/pppd/2.4.9/nm-l2tp-pppd-plugin.so loaded.
pppd[]: pppd 2.4.9 started by root, uid 0
pppd[]: Using interface ppp0
pppd[]: Connect: ppp0 <-->
pppd[]: Overriding mtu 1500 to 1400
pppd[]: Overriding mru 1500 to mtu value 1400
NetworkManager[]: <info> [] manager: (ppp0): new Ppp device (/org/freedesktop/NetworkManager/Devices/10)
pppd[]: Overriding mtu 1450 to 1400
pppd[]: CHAP authentication succeeded
pppd[]: local LL address fe80::a889:6a2d:2784:bb56
pppd[]: remote LL address fe80::0000:0000:00f3:6253
NetworkManager[]: <info> [] device (ppp0): state change: unmanaged -> unavailable (reason 'connection-assumed', sys-iface-state: 'external')
NetworkManager[]: <info> [] device (ppp0): state change: unavailable -> disconnected (reason 'none', sys-iface-state: 'external')
pppd[]: local IP address 44.148.184.219
pppd[]: remote IP address 44.148.186.1
pppd[]: primary DNS address 44.148.186.1
As soon as the VPN connection is up and running you may see an additional network device with the name ppp0:
db2kc@rpi4ham:~$ ip addr
1: lo: <LOOPBACK,UP,LOWER_UP> mtu 65536 qdisc noqueue state UNKNOWN group default qlen 1000
    link/loopback 00:00:00:00:00:00 brd 00:00:00:00:00:00
    inet 127.0.0.1/8 scope host lo
        valid_lft forever preferred_lft forever
    inet6 ::1/128 scope host noprefixroute
        valid_lft forever preferred_lft forever
2: eth0: <BROADCAST,MULTICAST,UP,LOWER_UP> mtu 1500 qdisc mq state UP group default qlen 1000
...
3: wlan0: <BROADCAST,MULTICAST,UP,LOWER_UP> mtu 1500 qdisc pfifo_fast state UP group default qlen 1000
...
10: ppp0: <POINTOPOINT,MULTICAST,NOARP,UP,LOWER_UP> mtu 1400 qdisc pfifo_fast state UNKNOWN group default qlen 3
    link/ppp
    inet 44.148.184.219 peer 44.148.186.1/32 scope global ppp0
        valid_lft forever preferred_lft forever
    inet6 fe80::70d5:adab:4f78:d8db peer fe80::f3:63a0/128 scope link
        valid_lft forever preferred_lft forever
A different view of your connection(s):
db2kc@rpi4ham:~$ nmcli connection
NAME             UUID                                 TYPE DEVICE
B2KC_Hamnet_L2TP 007a16b0-9158-4fc4-b69e-a9d815f57480 vpn  eth0
Another way to see your temporary IP address on the Hamnet (addresses of local network connections removed):
db2kc@rpi4ham:~$ hostname -I
192.168.xxx.xxx 192.168.xxx.xxx 44.148.184.219
Here the messages when the VPN connection is closed (timestamps removed):
NetworkManager[]: <info> [] audit: op="connection-deactivate" uuid="007a16b0-9158-4fc4-b69e-a9d815f57480" name="DB2KC_Hamnet_L2TP" pid=1443 uid=1000 result="success"
NetworkManager[]: xl2tpd[]: death_handler: Fatal signal 15 received
NetworkManager[]: xl2tpd[]: Terminating pppd: sending TERM signal to pid 104740
NetworkManager[]: xl2tpd[]: Connection 100 closed to 137.226.79.99, port 1701 (Server closing)
pppd[]: Terminating on signal 15
pppd[]: Connect time 0.6 minutes.
NetworkManager[]: <info> [] device (ppp0): state change: disconnected -> unmanaged (reason 'connection-assumed', sys-iface-state: 'external')
pppd[]: Sent 644 bytes, received 500 bytes.
pppd[]: Overriding mtu 1500 to 1400
pppd[]: Overriding mru 1500 to mtu value 1400
pppd[]: Connection terminated.
pppd[]: Connect time 0.6 minutes.
pppd[]: Sent 644 bytes, received 500 bytes.
pppd[]: Modem hangup
pppd[]: Exit.
Debugging failed VPN connections
In very rare cases the negotiation of “xl2tpd” with the VPN server might fail. Example from syslog:
nm-l2tp-service[]: xl2tpd started with pid 15927
NetworkManager[]: xl2tpd[]: Not looking for kernel SAref support.
NetworkManager[]: xl2tpd[]: Using l2tp kernel support.
NetworkManager[]: xl2tpd[]: xl2tpd version xl2tpd-1.3.18 started on rpi500 PID:15927
NetworkManager[]: xl2tpd[]: Written by Mark Spencer, Copyright (C) 1998, Adtran, Inc.
NetworkManager[]: xl2tpd[]: Forked by Scott Balmos and David Stipp, (C) 2001
NetworkManager[]: xl2tpd[]: Inherited by Jeff McAdams, (C) 2002
NetworkManager[]: xl2tpd[]: Forked again by Xelerance (www.xelerance.com) (C) 2006-2016
NetworkManager[]: xl2tpd[]: Listening on IP address 0.0.0.0, port 41058
NetworkManager[]: xl2tpd[]: Connecting to host 137.226.79.99, port 1701
NetworkManager[]: xl2tpd[]: death_handler: Fatal signal 15 received
NetworkManager[]: xl2tpd[]: Connection 0 closed to 137.226.79.99, port 1701 (Server closing)
NetworkManager[]: <warn>[] vpn[0x5555a2892830,6c5d002b-9368-4e2b-8708-4ebfeb5336ff,"DB2KC_Hamnet_L2TP```]: dbus: failure: connect-failed (1)
You may increase the number of syslog messages. With root privileges edit the file /etc/xl2tpd/xl2tpd.conf and change the settings for option ppp debug (near line 41) under section [lns default] from no to yes and remove the comment for this line and the section header:
[lns default] ; Our fallthrough LNS definition
...
; unix authentication = no ; * Use /etc/passwd for auth.
; name = myhostname ; * Report this as our hostname
ppp debug = yes; * Turn on PPP debugging
But beware the syslog gets flooded. Make sure that you restore the original version of xl2tpd.conf after finishung your tests.
Configuration files used by network manager
Details about this VPN configuration can be found in the folder /etc/NetworkManager/system-connections. In the example described above the connection was given the name DB2KC_Hamnet_L2TP. Thus, you may expect to see the following file:
db2kc@rpi4ham:~$ ls -l /etc/NetworkManager/system-connections/
total 16
-rw------- 1 root root 592 2024-10-20 18:55 DB2KC_Hamnet_L2TP.nmconnection
Example from the autor’s machine with annotations added:
[connection]
id=DB2KC\Hamnet\L2TP
uuid=xxxxxxxx-xxxx-xxxx-xxxx-xxxxxxxxxxxx
type=vpn
autoconnect=false
permissions=user:db2kc:; ← your username on the Linux system
timestamp=1753370683

[vpn]
gateway=vpn.afu.rwth-aachen.de
ipsec-enabled=yes
machine-auth-type=psk
mru=1400
mtu=1400
password-flags=0
refuse-eap=yes
refuse-mschap=yes
refuse-pap=yes
user=db2kc ← your VPN user id (i.e. callsign)user-auth-type=password
service-type=org.freedesktop.NetworkManager.l2tp

[vpn-secrets]
ipsec-psk=hamnetaachen
password=xxxxxxxxxxxxxxxxxxxxxxxxx ← your VPN password

[ipv4]
ignore-auto-routes=true
method=auto
never-default=true
route1=44.128.0.0/10,44.148.186.1

[ipv6]
addr-gen-mode=stable-privacy
method=disabled

[proxy]
Don’t get confused, in this example the username on the Raspberry Pi was the same as the VPN username. Of course you are free to choose a different username on your local machine.
How to create a VPN configuration via command line
Unfortunately nmtui is not (yet) capable to create VPN connections nor edit an existing configuration. It’s up to you to try it with nmcli.
However – as some kind of workaround – you may easily grab the file Callsign_Hamnet_L2TP.nmconnection created by the NetworkManager GUI application and copy it to a different system w/o a GUI desktop (see below). Make sure that you are on the same version of NetworkManager. You may copy an older version of the config to a newer environment (in my cases NetworkManager fixed this on the fly). But a downgrade will most likely fail.
See also:
- Create anyconnect VPN connection on command line with nmcli (example !)
http://www.panticz.de/create-anyconnect-vpn-connection-on-command-line-with-nmcli - yyolk/nm_l2tp_ipsec_vpn.md – setup L2TP IPsec VPN in archlinux using NetworkManager
https://gist.github.com/yyolk/ccafbdf9f47fc85b1a7ca9bcba67472c - L2TP Connection Client on ubuntu 18.04 Server (!)
https://askubuntu.com/questions/1167283/l2tp-connection-client-on-ubuntu-18-04-server - centos 7 nmcli l2tp VPN using command line
https://unix.stackexchange.com/questions/689318/centos-7-nmcli-l2tp-vpn-using-command-line - How to set routes for my VPN connection (!)
https://askubuntu.com/questions/84516/how-to-set-routes-for-my-vpn-connection - Manual added routes and rules in Network manager (!)
https://unix.stackexchange.com/questions/749887/manual-added-routes-and-rules-in-network-manager - Configuring Static Routes Using nmcli
https://docs.redhat.com/en/documentation/red_hat_enterprise_linux/7/html/networking_guide/sec-configuring_static_routes_using_nmcli - How to configure L2TP client in Linux [console edition]
https://410g0n3.medium.com/how-to-configure-l2tp-client-in-linux-console-edition-58ccbeaaf649 - How to export and migrate NetworkManager settings to new system? (!!)
https://unix.stackexchange.com/questions/351005/how-to-export-and-migrate-networkmanager-settings-to-new-system - Linux: Configure VPN using NMCLI (including firewall rules)
https://0xsys.blogspot.com/2019/06/configure-vpn-using-nmcli.html - OpenVPN adding unwanted default route – how to fix without GUI (?)
https://forums.rockylinux.org/t/openvpn-adding-unwanted-default-route-how-to-fix-without-gui/11466
Connect to Hamnet VPN server without GUI desktop
Let’s assume that you copied the configuration from the setup described above, i.e. DB2KC_Hamnet_L2TP. If you want to connect to Hamnet VPN using a headless machine (ex: Raspberry Pi) then follow these steps:
Open a terminal session or login via SSH and enter the following command:
db2kc@rpi4ham:~$ nmtui-connect DB2KC_Hamnet_L2TP Connection_name
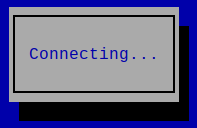
A curses based applet pops up:
Alternate solution:
db2kc@rpi4ham:~$ nmcli connection up Connection_name
After 1..2 seconds the applet disappears; the connection is established. You may check it with the following commands:
db2kc@rpi4ham:~$ nmcli connection
NAME              UUID                                 TYPE     DEVICE
DB2KC_Hamnet_L2TP xxxxxxxx-xxxx-xxxx-xxxx-xxxxxxxxxxxx vpn      eth0
lo                xxxxxxxx-xxxx-xxxx-xxxx-xxxxxxxxxxxx loopback lo

db2kc@rpi4ham:~$ ip addr
1: lo: <LOOPBACK,UP,LOWER_UP> mtu 65536 qdisc noqueue state UNKNOWN group default qlen 1000
    link/loopback 00:00:00:00:00:00 brd 00:00:00:00:00:00
    inet 127.0.0.1/8 scope host lo
        valid_lft forever preferred_lft forever
        inet6 ::1/128 scope host noprefixroute
        valid_lft forever preferred_lft forever
2: eth0: <BROADCAST,MULTICAST,UP,LOWER_UP> mtu 1500 qdisc mq state UP group default qlen 1000
3: wlan0: <BROADCAST,MULTICAST,UP,LOWER_UP> mtu 1500 qdisc pfifo_fast state UP group default qlen 1000
4: ppp0: <POINTOPOINT,MULTICAST,NOARP,UP,LOWER_UP> mtu 1400 qdisc pfifo_fast state UNKNOWN group default qlen 3
    link/ppp
    inet 44.148.184.214 peer 44.148.186.1/32 scope global ppp0
    valid_lft forever preferred_lft forever
    inet6 fe80::a528:3652:ba50:5ba7 peer fe80::f4:39f5/128 scope link
        valid_lft forever preferred_lft forever
The command nmtui-connect is actually a symlink to nmtui, the NetworkManaget TUI. Thus, you may simply enter nmtui to start the CLI version of NM.
Disconnect from Hamnet VPN server without GUI desktop
Open a terminal session or login via SSH and enter the following command:
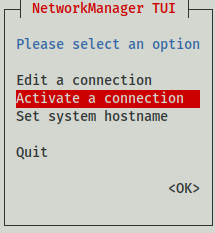
db2kc@rpi4ham:~$ nmtui
A curses based applet pops up. With the cursor down key navigate until Activate connection appears in red color. Hit the tab key; OK appears highlighted; hit the Return key.
Navigate to the VPN connection.
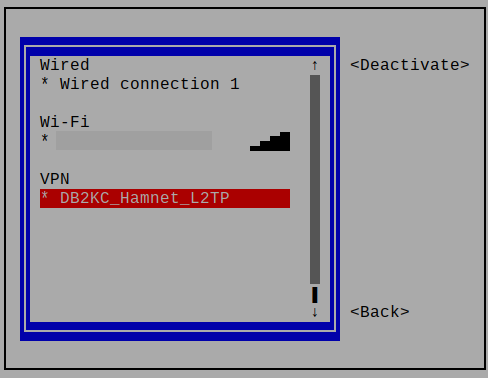
With the tab key select Deactivate and hit return key. The VPN connection is closed. Navigate to Back and hit Return1 key to terminate the application. You’re done.
Alternate solution:
db2kc@rpi4ham:~$ nmcli connection down Connection_name
Troubleshooting
Unexpected password request
If you saved your VPN password into the Gnome keyring and you are running a GUI desktop then you may see this popup window:
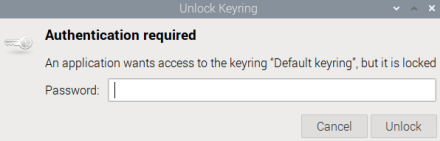
Password required to open Gnome keyring
In this case you are blocked; you cannot any longer access any other application on the desktop. The system is still fully operational, i.e. you may easily log in via an SSH session. All you have to do here is to enter the same password that you used when saving the VPN password into the keyring, in most cases your login password.
This is the reason why I recommended to save the password into the NetworkManager configuration file.
Collection of URLs
L2TP
- Layer 2 Tunneling Protocol
https://en.wikipedia.org/wiki/Layer_2_Tunneling_Protocol - L2TP VPN is not working on Ubuntu 20.04. Same credential is working fine with Ubuntu 18.04
https://askubuntu.com/questions/1301366/l2tp-vpn-is-not-working-on-ubuntu-20-04-same-credential-is-working-fine-with-ub - Installing L2TP/IPSEC Client
https://discourse.lubuntu.me/t/installing-l2tp-ipsec-client/3960
Hamnet VPN setup
- HAMNET VPN Anleitung für Windows 10
https://www.afu.rwth-aachen.de/projekte/hamnet/anwendungen/ftp-server/11-static-content/hamnet-vpn - HAMNET-VPN Anleitung für Windows 7 L2TP
https://www.afu.rwth-aachen.de/…/227-hamnet-vpn-anleitung-fuer-windows-7-l2tp - HAMNET über VPN mit WireGuard
https://echo34.de/prdigipeaterrelaishamnet/hamnet/vpn-zu-db0agi/
VPN client configuration
- Linux: Setting up a VPN to only route specific IP addresses (GUI based)
https://blog.rac.me.uk/2013/10/20/linux-setting-up-a-vpn-to-only-route-specific-ip-addresses/
Gnome keyring
- GNOME Help – Update the keyring password
https://help.gnome.org/users/seahorse/stable/keyring-update-password.html - libsecret Library – a library for storing and retrieving passwords and other secrets
https://wiki.gnome.org/Projects/Libsecret - libsecret – secret-tool Usage
https://wiki.gbe0.com/linux/snippets/libsecret-secret-tool - Using linux keyring secrets from your scripts
https://lzone.de/blog/Using-Linux-keyring-secrets-from-your-scripts - Linux Mint Forums – How to open Default Keyring
https://forums.linuxmint.com/viewtopic.php?t=392715 - Seahorse – A GNOME encryption interface
https://wiki.gnome.org/Apps/Seahorse
Vy 73 de DB2KC